Subcontract your Manufacturing
Outsourcing a portion of some or all your company’s manufacturing needs is not easy. To make it work right, you have to:
Manage the inventory of raw materials at your subcontractor;
Ship new materials to your subcontractors based on your forecasted demand;
Keep track of manufacturing operations done at the subcontractor location;
Control incoming goods quality;
Control subcontractors bills.
Here is an example of subcontracting the manufacturing of “C”, which is produced out of raw materials “A” and “B”.
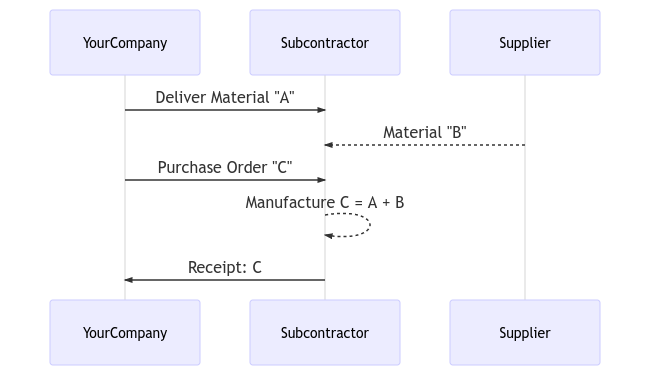
With its subcontracting feature, Flectra helps you handle this flow easily.
Configuration
To use the subcontracting feature, go to and tick the box Subcontracting.

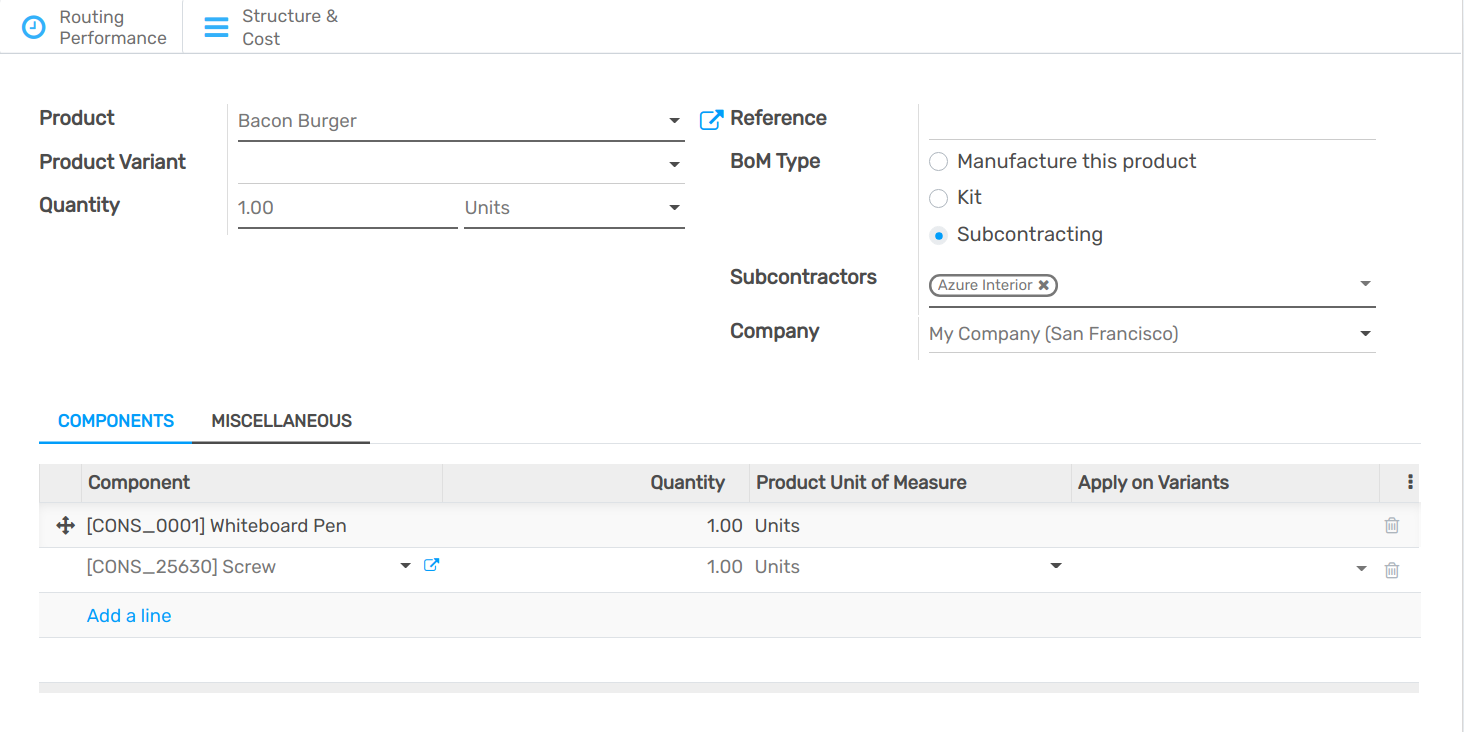
To define if a product must be subcontracted, use a Bill of Materials (BoM) of type Subcontracting.
To create a new BoM, go to and hit create. Then, list the components your subcontractor needs to manufacture the product. For costing purposes, you might want to register all the components, even the ones that are sourced directly from the subcontractor.
Once you have set the BoM Type to Subcontracting, specify one or several subcontractors.
Basic Subcontracting Flow
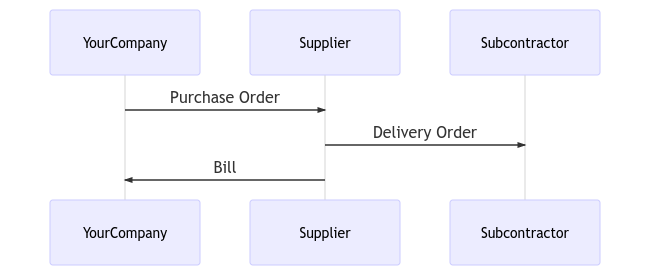
To let your subcontractor know how many products you need, create and send them purchase orders (PO). To do so, open the Purchase app and create a new one. Be sure to send the PO to a vendor that is defined as a subcontractor on the BoM.
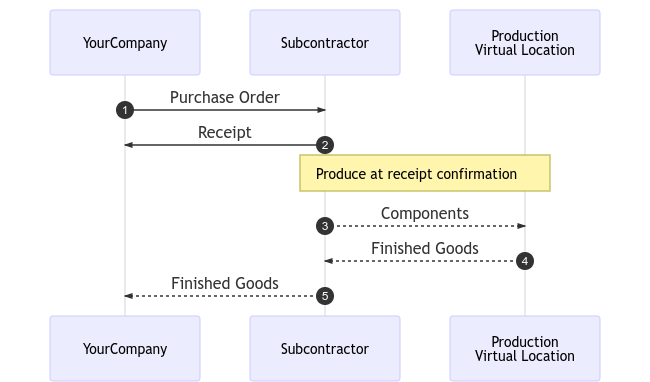
Once the PO is validated (1), a pending receipt is created. When the products are received, validate the receipt (2), with the actual quantity received. Then Flectra automatically created several inventory moves:
Consume the components at the subcontractor’s location, based on the BoM (3);
Produce finished goods at the subcontractor’s location (4);
Move products from the subcontractor’s location to YourCompany through the validated receipt (5).
Of course, Flectra does all the transactions for you, automatically. Simply control the vendor bill with the usual matching process with the purchase order.
Note
The PO is optional. If you create a receipt manually, with the right subcontractor, Flectra still performs all the moves. Useful if the subcontractor does not bill a fixed price per item, but rather the time and materials used.
Inventory Valuation
The cost of the manufactured product “C” is defined as:
C = A + B + s
With:
A: Cost of raw materials coming from YourCompany;
- B: Cost of raw materials sourced directly from the
subcontractor;
s: Cost of the subcontracted service.
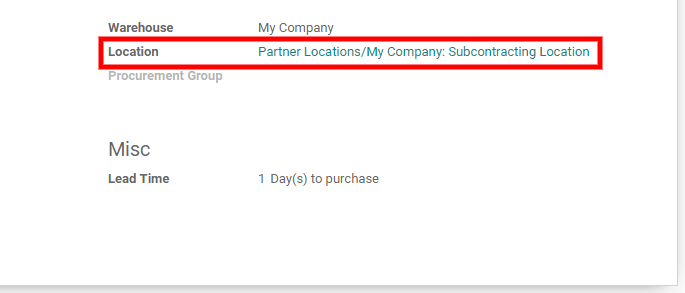
Sending raw materials to your subcontractors (A) does not impact the inventory valuation, the components still belonging to your company. To manage this, the Subcontracting Location is configured as an Internal Location so that the components are still valued in the inventory.
Then, the vendor price set on the product C form has to be what has to be paid to the subcontractor for his parts and service time: B + s. The product cost has to be: A + B + s, how much the product is valued in the accounting.
Finally, the subcontractor bill matches the purchase order, with the proposed price coming from the finished products C.
Note
If managing the replenishment of raw materials B at your subcontractor’s location is not needed, simply include the cost of B in the subcontractor’s price s and remove the products B from the BoM.
Traceability
In case the products received from the subcontractor contain tracked components, their serial or lot numbers need to be specified during the receipt.
On the receipt of the subcontracted product, a Record Components button appears when necessary. Click on it to open a dialog and record the serial/lot numbers of the components. If the finished product is also tracked, its serial/lot number can be registered here too.

For audit purposes, it is possible to check the lot numbers recorded on a receipt by using the icon on the right of the finished products:

Automate Replenishment of Subcontractors
To manage the resupply of your subcontractor, activate Multi-locations in . Then, the inventory at the subcontractor location can be tracked.
It is possible to resupply subcontractors by sending products from the company locations, or by sending products from another supplier to the subcontractors.
Replenishment from the warehouse
Resupplying subcontractors manually is the simplest approach. To do so, create delivery orders in which the subcontractor is set as a delivery address and fill the components to deliver.
To automate the subcontractors’ replenishment propositions, there are two approaches:
Reordering rules;
Replenish on order flow.
For the first one, just define a reordering rule on the subcontracting location, with a minimum and maximum inventory level. When the reordering rule is triggered, a delivery order is created to ship the components to the subcontractor.
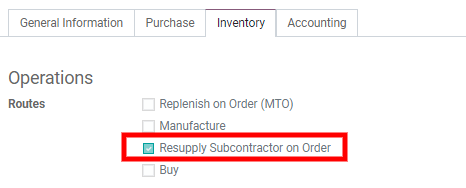
The second approach is to use a “pull” flow. Here, the demand in the finished product (real demand or forecasted one through the Master Production Schedule) triggers the replenishment of the subcontractor. To do so, select the route Resupply Subcontractor on Order on the wanted components.
Replenishment from another supplier
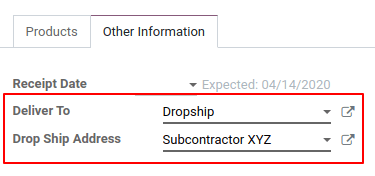
When purchasing items to another supplier, it is possible to ask him to deliver the subcontractor directly. To do so, activate the Drop Shipping feature in .
Now, set the Dropship option in the Deliver To field of the Other Information tab. Then, provide the address of the subcontractor for the shipping.
That way, the supplier can ship items directly and you simply receive and pay the bill. However, it is still required to validate receipts for the subcontractor.
Quality Control
Controlling the quality of the products manufactured by subcontractors is possible thanks to the Flectra Quality app. Quality checks can be made on a manufacturing step but, because the manufacturing process is handled by an external party, it can be defined on the product reception.
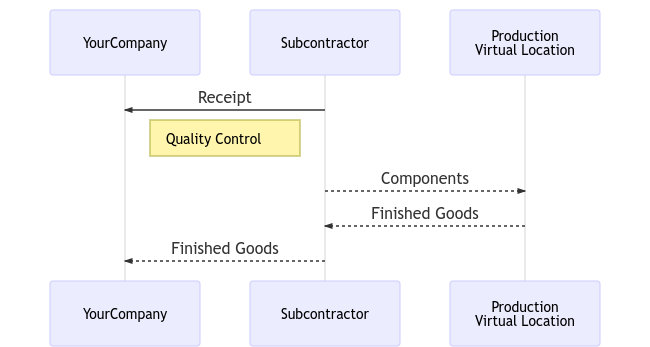
To create a quality check at the receipt, open the Quality app and create a new Control Point on the reception.
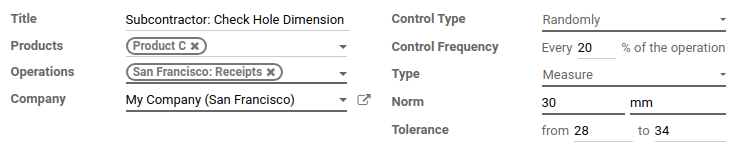
By doing so, a quality check is automatically created each time a finished product is received.