Chapter 7: Basic Views
We have seen in the previous chapter that Flectra is able to generate default views for a given model. In practice, the default view is never acceptable for a business application. Instead, we should at least organize the various fields in a logical manner.
Views are defined in XML files with actions and menus. They are instances of the
ir.ui.view model.
In our real estate module, we need to organize the fields in a logical way:
in the list (tree) view, we want to display more than just the name.
in the form view, the fields should be grouped.
in the search view, we must be able to search on more than just the name. Specifically, we want a filter for the ‘Available’ properties and a shortcut to group by postcode.
List
Reference: the documentation related to this topic can be found in List.
Note
Goal: at the end of this section, the list view should look like this:
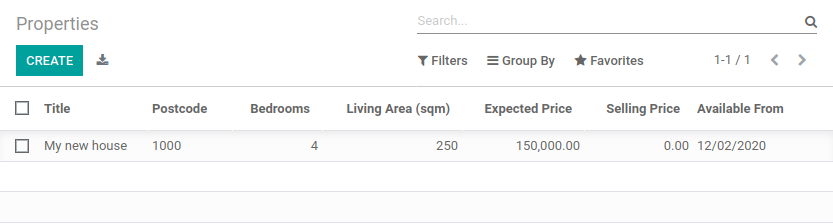
List views, also called tree views, display records in a tabular form.
Their root element is <tree>. The most basic version of this view simply
lists all the fields to display in the table (where each field is a column):
<tree string="Tests">
    <field name="name"/>
    <field name="last_seen"/>
</tree>
A simple example can be found here.
Exercise
Add a custom list view.
Define a list view for the estate.property model in the appropriate XML file. Check the
Goal of this section for the fields to display.
Tips:
do not add the
editable="bottom"attribute that you can find in the example above. We’ll come back to it later.some field labels may need to be adapted to match the reference.
As always, you need to restart the server (do not forget the -u option) and refresh the browser
to see the result.
Warning
You will probably use some copy-paste in this chapter, therefore always make sure that the id
remains unique for each view!
Form
Reference: the documentation related to this topic can be found in Form.
Note
Goal: at the end of this section, the form view should look like this:
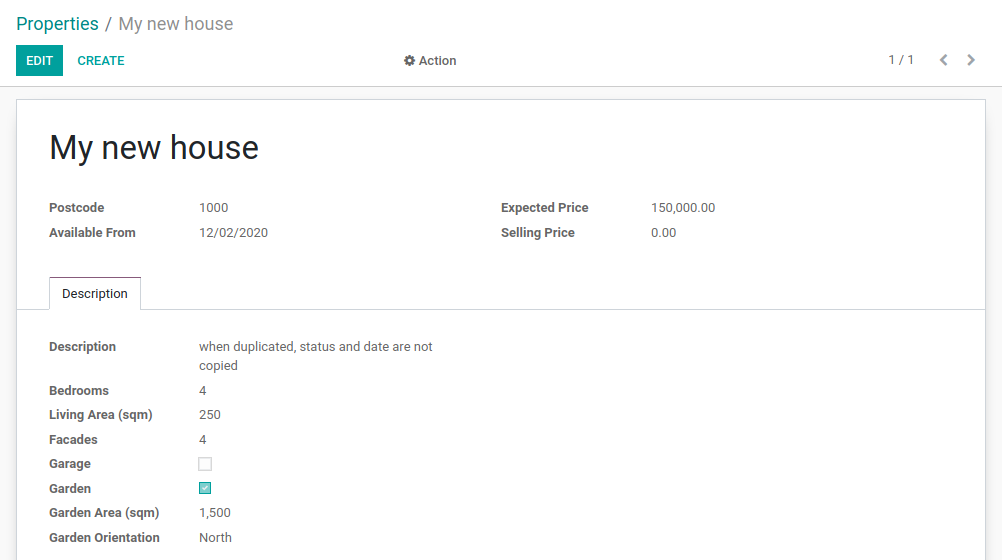
Forms are used to create and edit single records.
Their root element is <form>. They are composed of high-level structure
elements (groups and notebooks) and interactive elements (buttons and fields):
<form string="Test">
    <sheet>
        <group>
            <group>
                <field name="name"/>
            </group>
            <group>
                <field name="last_seen"/>
            </group>
            <notebook>
                <page string="Description">
                    <field name="description"/>
                </page>
            </notebook>
        </group>
    </sheet>
</form>
It is possible to use regular HTML tags such as div and h1 as well as the the class attribute
(Flectra provides some built-in classes) to fine-tune the look.
A simple example can be found here.
Exercise
Add a custom form view.
Define a form view for the estate.property model in the appropriate XML file. Check the
Goal of this section for the expected final design of the page.
This might require some trial and error before you get to the expected result ;-) It is advised that you add the fields and the tags one at a time to help understand how it works.
In order to avoid relaunching the server every time you do a modification to the view, it can
be convenient to use the --dev xml parameter when launching the server:
$ ./flectra-bin --addons-path=../custom,../professional/,addons -d rd-demo -u estate --dev xml
This parameter allows you to just refresh the page to view your view modifications.
Search
Reference: the documentation related to this topic can be found in Search.
Note
Goal: at the end of this section, the search view should look like this:
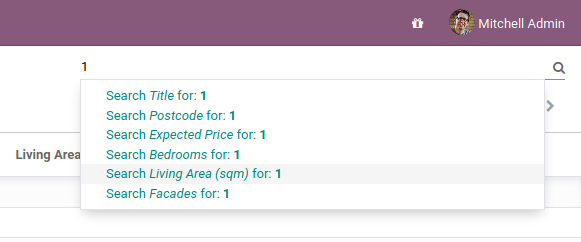
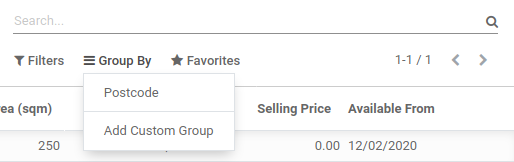
Search views are slightly different from the list and form views since they don’t display content. Although they apply to a specific model, they are used to filter other views’ content (generally aggregated views such as List). Beyond the difference in use case, they are defined the same way.
Their root element is <search>. The most basic version of this view simply
lists all the fields for which a shortcut is desired:
<search string="Tests">
    <field name="name"/>
    <field name="last_seen"/>
</search>
The default search view generated by Flectra provides a shortcut to filter by name. It is very
common to add the fields which the user is likely to filter on in a customized search view.
Exercise
Add a custom search view.
Define a search view for the estate.property model in the appropriate XML file. Check the
first image of this section’s Goal for the list of fields.
After restarting the server, it should be possible to filter on the given fields.
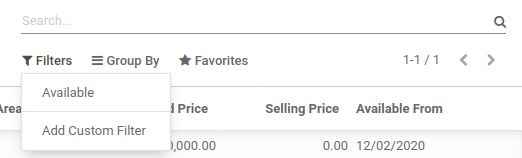
Search views can also contain <filter> elements, which act as toggles for
predefined searches. Filters must have one of the following attributes:
domain: adds the given domain to the current searchcontext: adds some context to the current search; uses the keygroup_byto group results on the given field name
A simple example can be found here.
Before going further in the exercise, it is necessary to introduce the ‘domain’ concept.
Domains
Reference: the documentation related to this topic can be found in Search domains.
In Flectra, a domain encodes conditions on records: a domain is a list of criteria used to select a subset of a model’s records. Each criterion is a triplet with a field name, an operator and a value. A record satisfies a criterion if the specified field meets the condition of the operator applied to the value.
For instance, when used on the Product model the following domain selects all services with a unit price greater than 1000:
[('product_type', '=', 'service'), ('unit_price', '>', 1000)]
By default criteria are combined with an implicit AND, meaning every criterion
needs to be satisfied for a record to match a domain. The logical operators
& (AND), | (OR) and ! (NOT) can be used to explicitly combine
criteria. They are used in prefix position (the operator is inserted before
its arguments rather than between). For instance, to select products ‘which are
services OR have a unit price which is NOT between 1000 and 2000’:
['|',
    ('product_type', '=', 'service'),
    '!', '&',
        ('unit_price', '>=', 1000),
        ('unit_price', '<', 2000)]
Exercise
Add filter and Group By.
The following should be added to the previously created search view:
a filter which displays available properties, i.e. the state should be ‘New’ or ‘Offer Received’.
the ability to group results by postcode.
Looking good? At this point we are already able to create models and design a user interface which makes sense business-wise. However, a key component is still missing: the link between models.