Chapter 2: Development Environment Set-up
There are multiple ways to install Flectra depending on the intended use case.
This document attempts to describe the installation options for an internal Flectra R&D developer. We assume that you are installing your development environment on a standard Flectra laptop with Linux Mint installed and up-to-date. At the time of writing, we are using a vanilla Linux Mint 20 (Ubuntu 20.04) as a starting point.
If you are using another environment, you can refer to Source Install.
Fetch the sources & configure git
Install and configure git
The very first step of the installation process is to install the git version control system because the Flectra source code is managed on GitHub. Once installed, you can set your name and email:
$ sudo apt install git
$ git config --global user.name "Your full name"
$ git config --global user.email "xyz@flectrahq.com"
Configure GitHub
To fetch the sources and contribute to Flectra’s development you will need a GitHub account. We recommend using your trigram (xyz) followed by ‘-flectra’ as your username: ‘xyz-flectra’. If you prefer, you can also use your personal GitHub account.
The easiest way to authenticate with GitHub is to use an SSH connection. Using the SSH authentication will allow you to connect to GitHub without supplying your username and password every time.
The following instructions are based on the official GitHub documentation.
Here is a step-by-step procedure:
Generate a new SSH key, add it to the ssh-agent and copy the SSH key to your clipboard.
$ ssh-keygen -t ed25519 -C "xyz@flectrahq.com"
$ ssh-add ~/.ssh/id_ed25519
$ sudo apt-get install xclip
$ xclip -sel clip < ~/.ssh/id_ed25519.pub
In Github:
In the upper-right corner of any page, click your profile photo, then click Settings
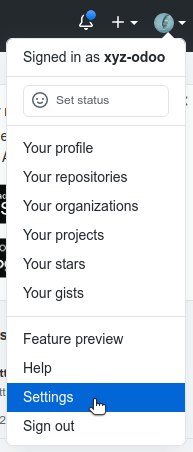
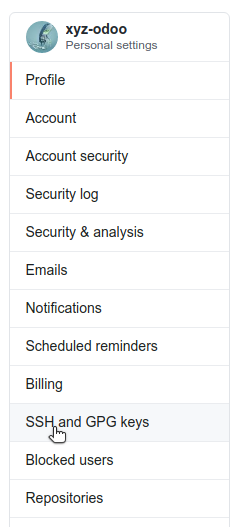
In the user settings sidebar, click SSH and GPG keys.
Click New SSH key or Add SSH key.

In the “Title” field, add a descriptive label for the new key.
Paste your key into the “Key” field.

Click Add SSH key.
Fetch the sources
All the Flectra sources will be located in $HOME/src/
$ mkdir -p $HOME/src
$ cd $HOME/src
$ git clone git@github.com:flectra/flectra.git
$ git clone git@github.com:flectra/Professional.git
Tip
Cloning the repositories will take a while, enjoy a cup of coffee while you wait.
Tip
You may need to ask your manager for read rights to fetch the Professional repository.
Configure development repository
To contribute to Flectra’s development you will need to fork the repository, create a branch containing your code in the fork and submit a Pull Request to the Flectra repository.
If you are lucky enough to work at Flectra, the forks already exist. They are called
flectra-dev/flectra and flectra-dev/Professional.
$ cd  $HOME/src/flectra
$ git remote add flectra-dev git@github.com:flectra-dev/flectra.git #add flectra-dev as a new remote
$ git remote rename origin flectra #change the name of origin (the flectra repository) to flectra
$ git remote set-url --push flectra no_push #remove the possibility to push to flectra (you can only push to flectra-dev)

$ cd  $HOME/src/Professional
$ git remote add Professional-dev git@github.com:flectra-dev/Professional.git
$ git remote rename origin Professional
$ git remote set-url --push Professional no_push
Useful git commands
Here are some useful git commands for your day-to-day work.
Change branch: When you change branches, both repositories (flectra and Professional) must be synchronized, i.e. both need to be in the same branch.
$ cd $HOME/src/flectra
$ git checkout2.0

$ cd $HOME/src/Professional
$ git checkout2.0
Fetch and rebase:
$ cd $HOME/src/flectra
$ git fetch --all --prune
$ git rebase --autostash flectra/2.0

$ cd $HOME/src/Professional
$ git fetch --all --prune
$ git rebase --autostash Professional/2.0
Install the dependencies
Python
Flectra requires Python 3.6 or later, if your computer is up-to-date you should already be at this version or higher.
You can check your Python version with:
$ python3 --version
Install pip3 and libraries
For libraries using native code, installation of development tools and native dependencies is required before installing the Python dependencies of Flectra.
$ sudo apt install python3-pip python3-dev libxml2-dev libxslt1-dev libldap2-dev libsasl2-dev libssl-dev libpq-dev libjpeg-dev
Install flectra requirements
$ cd $HOME/src/flectra
$ pip3 install -r requirements.txt
Install wkhtmltopdf
wkhtmltopdf is a library to render HTML into PDF. Flectra uses it to create PDF reports. wkhtmltopdf is not installed through pip and must be installed manually in version 0.12.5 to support headers and footers.
$ cd /tmp/
$ sudo wget https://github.com/wkhtmltopdf/wkhtmltopdf/releases/download/0.12.5/wkhtmltox_0.12.5-1.focal_amd64.deb
$ sudo gdebi --n wkhtmltox_0.12.5-1.focal_amd64.deb
$ sudo ln -s /usr/local/bin/wkhtmltopdf /usr/bin
$ sudo ln -s /usr/local/bin/wkhtmltoimage /usr/bin
Right-to-left interface support
In order to support right-to-left (RTL) languages, we need rtlcss to convert the CSS files:
$ sudo apt-get install nodejs npm
$ sudo npm install -g rtlcss
Install PostgreSQL
As seen in Chapter 1: Architecture Overview, Flectra uses PostgreSQL as a RDBMS. In the context of a development machine, the easiest approach is to install it locally. Then we can create a PostgreSQL user corresponding to our current user:
$ sudo apt install postgresql postgresql-client
$ sudo -u postgres createuser -s $USER
Some useful SQL commands:
$ createdb $DB_NAME #Create a database
$ dropdb $DB_NAME #Drop a database

$ psql $DB_NAME #Connect to a database
    \l #List all the available databases
    \dt #List all the tables of the $DB_NAME database
    \d $TABLE_NAME #Show the structure of the table $TABLE_NAME
    \q #Quit the psql environment (ctrl + d)
Run the server
Running flectra-bin
Once all dependencies are set up, Flectra can be launched by running flectra-bin, the command-line interface of the server.
$ cd $HOME/src/flectra/
$ ./flectra-bin --addons-path="addons/,../Professional/" -d rd-demo
There are multiple command-line arguments that you can use to configure the server. In this training you will only need some of them.
- -d <database>
The database that is going to be used.
- --addons-path <directories>
A comma-separated list of directories in which modules are stored. These directories are scanned for modules.
- --limit-time-cpu <limit>
Prevents the worker from using more than <limit> CPU seconds for each request.
- --limit-time-real <limit>
Prevents the worker from taking longer than <limit> seconds to process a request.
The last two can be used to prevent the worker from being killed when debugging the source code.
Tip
You may face an error similar to AttributeError: module '$MODULE_NAME' has no attribute '$ATTRIBUTE'
In this case you may need to re-install the module with $ pip install --upgrade --force-reinstall $MODULE_NAME
If this error occurs with more than one module then you may need to re-install all the
requirements with $ pip3 install --upgrade --force-reinstall -r requirements.txt
You can also clear the python cache to solve the issue
$ cd $HOME/.local/lib/python3.8/site-packages/
$ find -name '*.pyc' -type f -delete
Log in to Flectra
Open http://localhost:7073/ on your browser. We recommend you use:
Firefox,
Chrome
(Chromium the open source equivalent) or any other browser with
development tools.
To log in as the administrator user, you can use the following credentials:
email =
adminpassword =
admin
The developer mode
The Developer or Debug Mode gives you access to additional (advanced) tools.
This is useful for training and we assume that the user is in developer mode for the rest of the tutorials.
To activate the developer or debug mode you can follow the steps here.
Extra tools
Code Editor
If you are working at Flectra, many of your colleagues are using VSCode (VSCodium the open source equivalent), Sublime Text, Atom or PyCharm. However you are free to choose your preferred editor.
Don’t forget to configure your linters correctly. Using a linter can help you by showing syntax and semantic warnings or errors. Flectra source code tries to respect Python and JavaScript standards, but some of them can be ignored.
For Python, we use PEP8 with these options ignored:
E501: line too long
E301: expected 1 blank line, found 0
E302: expected 2 blank lines, found 1
For JavaScript, we use ESLint and you can find a configuration file example here.
Administrator tools for PostgreSQL
You can manage your PostgreSQL databases using the command line as demonstrated earlier or using a GUI application such as pgAdmin or DBeaver.
To connect the GUI application to your database we recommend you connect using the Unix socket.
Host name/address = /var/run/postgresql
Port = 5432
Username = $USER
Python Debugging
When facing a bug or trying to understand how the code works, simply printing things out can go a long way, but a proper debugger can save a lot of time.
You can use a classic Python library debugger (pdb, pudb or ipdb) or you can use your editor’s debugger. To avoid difficult configurations in the beginning, it is easier if you use a library debugger.
In the following example we use ipdb, but the process is similar with other libraries.
Install the library:
pip3 install ipdbTrigger (breakpoint):
import ipdb; ipdb.set_trace()Example:
   def copy(self, default=None):
       import ipdb; ipdb.set_trace()
       self.ensure_one()
       chosen_name = default.get('name') if default else ''
       new_name = chosen_name or _('%s (copy)') % self.name
       default = dict(default or {}, name=new_name)
       return super(Partner, self).copy(default)
Here is a list of commands:
- h(elp) [command]
Without an argument, print the list of available commands. With a command as an argument, print help about that command.
- pp expression
The value of the
expressionis pretty-printed using thepprintmodule.
- w(here)
Print a stack trace, with the most recent frame at the bottom.
- d(own)
Move the current frame one level down in the stack trace (to a newer frame).
- u(p)
Move the current frame one level up in the stack trace (to an older frame).
- n(ext)
Continue the execution until the next line in the current function is reached or it returns.
- c(ontinue)
Continue the execution and only stop when a breakpoint is encountered.
- s(tep)
Execute the current line, stop at the first possible occasion (either in a function that is called or on the next line in the current function).
- q(uit)
Quit the debugger. The program being executed is aborted.
Tip
To avoid killing the worker when debugging, you can add these arguments when launching the
server: --limit-time-cpu=9999 --limit-time-real=9999
Another solution is to add them directly in the ~/.flectrarc file:
$ cat ~/.flectrarc
[options]
limit_time_cpu = 9999
limit_time_real = 9999
Now that your server is running, it’s time to start writing your own application!