Chapter 10: Ready For Some Action?
So far we have mostly built our module by declaring fields and views. We just introduced business logic in the previous chapter thanks to computed fields and onchanges. In any real business scenario, we would want to link some business logic to action buttons. In our real estate example, we would like to be able to:
cancel or set a property as sold
accept or refuse an offer
One could argue that we can already do these things by changing the state manually, but this is not really convenient. Moreover, we want to add some extra processing: when an offer is accepted we want to set the selling price and the buyer for the property.
Action Type
Reference: the documentation related to this topic can be found in Actions and Error management.
Note
Goal: at the end of this section:
You should be able to cancel or set a property as sold:

A canceled property cannot be sold and a sold property cannot be canceled. For the sake of
clarity, the state field has been added on the view.
You should be able to accept or refuse an offer:
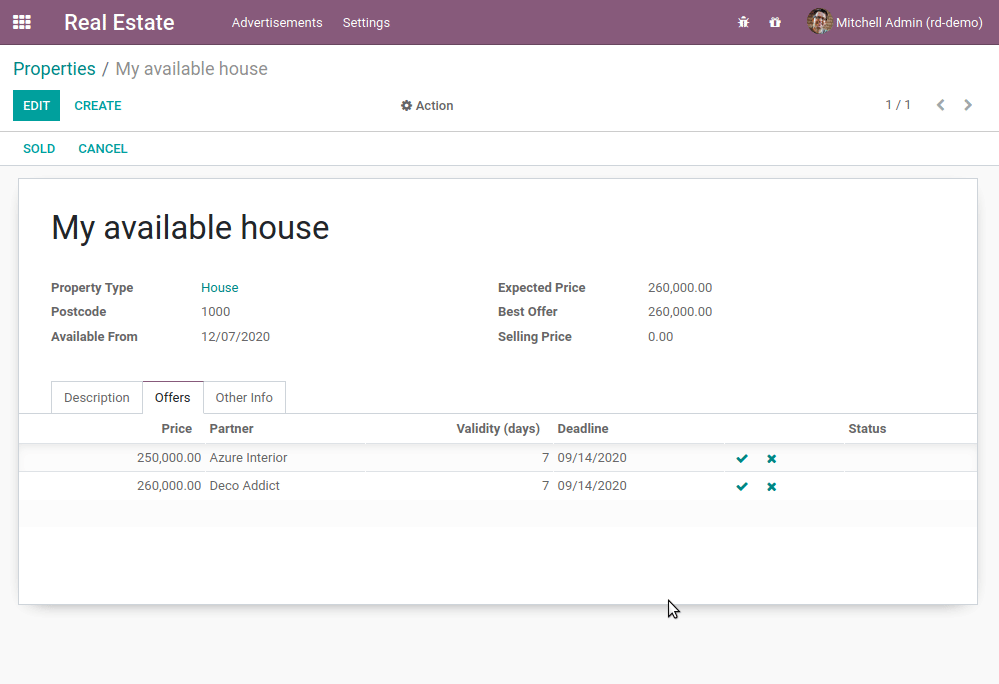
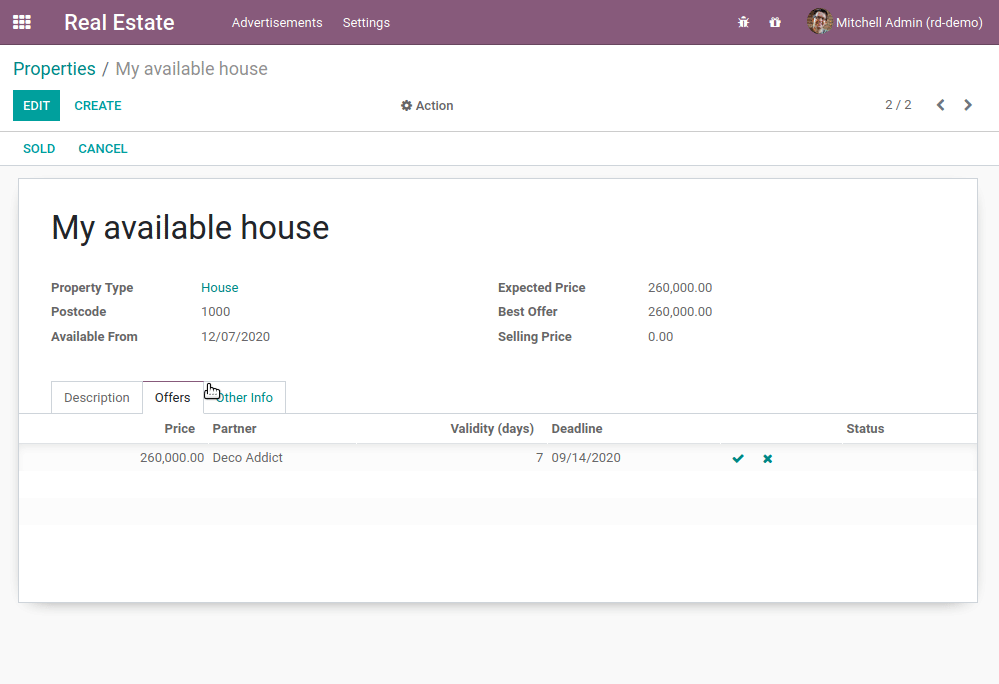
Once an offer is accepted, the selling price and the buyer should be set:
In our real estate module, we want to link business logic with some buttons. The most common way to do this is to:
Add a button in the view, for example in the
headerof the view:
<form>
    <header>
        <button name="action_do_something" type="object" string="Do Something"/>
    </header>
    <sheet>
        <field name="name"/>
    </sheet>
</form>
and link this button to business logic:
from flectra import fields, models

class TestAction(models.Model):
    _name = "test.action"

    name = fields.Char()

    def action_do_something(self):
        for record in self:
            record.name = "Something"
        return True
By assigning type="object" to our button, the Flectra framework will execute a Python method
with name="action_do_something" on the given model.
The first important detail to note is that our method name isn’t prefixed with an underscore
(_). This makes our method a public method, which can be called directly from the Flectra
interface (through an RPC call). Until now, all methods we created (compute, onchange) were called
internally, so we used private methods prefixed by an underscore. You should always define your
methods as private unless they need to be called from the user interface.
Also note that we loop on self. Always assume that a method can be called on multiple records; it’s
better for reusability.
Finally, a public method should always return something so that it can be called through XML-RPC.
When in doubt, just return True.
There are hundreds of examples in the Flectra source code. One example is this button in a view and its corresponding Python method
Exercise
Cancel and set a property as sold.
Add the buttons ‘Cancel’ and ‘Sold’ to the
estate.propertymodel. A canceled property cannot be set as sold, and a sold property cannot be canceled.Refer to the first image of the Goal for the expected result.
Tip: in order to raise an error, you can use the UserError function. There are plenty of examples in the Flectra source code ;-)
Add the buttons ‘Accept’ and ‘Refuse’ to the
estate.property.offermodel.Refer to the second image of the Goal for the expected result.
Tip: to use an icon as a button, have a look at this example.
When an offer is accepted, set the buyer and the selling price for the corresponding property.
Refer to the third image of the Goal for the expected result.
Pay attention: in real life only one offer can be accepted for a given property!
Object Type
In Chapter 6: Finally, Some UI To Play With, we created an action that was linked to a menu. You may be wondering if it is possible to link an action to a button. Good news, it is! One way to do it is:
<button type="action" name="%(test.test_model_action)d" string="My Action"/>
We use type="action" and we refer to the external identifier in the name.
In the next chapter we’ll see how we can prevent encoding incorrect data in Flectra.